Quản lý các bên liên quan trong dự án – Stakeholder
Management là một trong những khía cạnh quan trọng của công việc quản lý dự án. Thành công hay thất bại của một dự án phụ thuộc rất nhiều đến các đối tượng liên quan. Do đó, đây là thách thức lớn để quản lý các bên liên quan một cách hiệu quả và giữ các bên liên quan vui vẻ hỗ trợ dự án đi đến thành công.
👉👉Bạn đã sẵn sàng để quản lý các đối tượng liên quan khó tính và luôn gây khó khăn cho bạn chưa?
Việc lên kế hoạch quản lý các đối tượng liên quan là điều kiện cần để đi đến một dự án thành công. Chính vì vậy việc cần làm đầu tiên của một Project Manager hoặc Business Analyst khi tiến hành dự án là:
✅ Lập kế hoạch chi tiết, liệt kê tất cả các đối tượng liên quan đến dự án?
✅ Hoạch định rõ vai trò của họ trong dự án
✅ Phân bổ vị trí các đối tượng cần tham gia ở từng giai đoạn của dự án
✅ Tầm ảnh hưởng của các bên liên quan đến từng giai đoạn của dự án như thế nào?
Tất cả những điều đó sẽ giúp bạn nhìn nhận được bức tranh tổng thể về các đối tượng liên quan, sử dụng thông tin để đàm phán với họ và nhận được sự cam kết tham gia. Nhưng thực tế diễn ra sẽ không giống với kế hoạch, bạn cần làm nhiều hơn thế để quản lý được sự cam kết tham gia của các bên liên quan.
Ở vai trò một Project Manager – PM hoặc một Business Analyst – BA, tôi chia sẻ với bạn một số cách quản lý các đối tượng liên quan khó tính hoặc có xu hướng gây khó khăn cho dự án của bạn.
👉 Tìm ra bằng được đối tượng không muốn dự án thành công
Mỗi đối tượng tham gia dự án với các mục tiêu khác nhau, nhưng liệu bạn chắc chắn rằng ai cũng muốn dự án đi đến thành công? Có rất nhiều yếu tố liên quan đến chính trị ở môi trường của khách hàng, hoặc có một số đối tượng muốn doanh nghiệp duy trì giải pháp mà chính bản thân họ đã xây dựng trong quá khứ có lợi cho chính họ, hoặc có một số đối tượng chưa sẵn sàng thay đổi thói quen công việc hiện tại của họ,..vv. Ở vai trò một PM hoặc BA bạn cần tìm ra bằng được đối tượng liên quan nào không muốn dự án thành công và đưa họ vào danh sách quản lý đặc biệt.
👉 Suy nghĩ và hành động như một người bán hàng
Quản lý các đối tượng liên quan khó tính cũng không khác với việc một người bán hàng bán sản phẩm, dịch vụ cho một khách hàng khó tính. Một nhân viên bán hàng xuất sắc thuyết phục khách hàng của mình ngay cả sản phẩm, dịch vụ không đáp ứng hoàn toàn nhu cầu của họ ở thời điểm hiện tại. Các nhân viên bán hàng với tính cách khéo léo của mình, sử dụng các ý kiến tích cực của khách hàng để phản hồi, hiểu rõ được sản phẩm mình đang bán, lắng nghe tích cực và đồng cảm với khách hàng để xây dựng sự tin tưởng từ khách hàng.
Bên cạnh đó, tiếp nhận những ý kiến tiêu cực từ khách hàng để có thể xây dựng dịch vụ bán hàng tốt hơn, chuyên nghiệp hơn. Anh ấy sẽ thúc đẩy cái tôi của khách hàng nếu cần. Anh ấy cũng sẽ chấp nhận sửa chữa trục trặc của sản phẩm, dịch vụ nếu có. Ở vai trò PM hoặc BA bạn có thể học cách bán sản phẩm, dịch vụ của mình như cách mà một nhân viên bán hàng xuất sắc thể hiện để vượt qua các đối tượng liên quan khó tính.
👉 Hãy luôn hành động để khách hàng có cảm giác “Bạn đang đứng về phía họ”
Nếu chỉ dừng lại ở mức khiến cho các đối tượng liên quan có cảm giác “Bạn đứng về phía họ” thì vẫn chưa đủ để thuyết phục với những đối tượng liên quan khó tính để họ thích ứng với sự thay đổi. Tất cả cuộc nói chuyện tốt đẹp chỉ giúp phá vỡ tảng băng chứ chưa đủ sức làm tan chảy tảng băng. Nói phải đi đôi với làm. Những vấn đề nghiêm trọng ảnh hưởng đến hiệu suất và toàn vẹn dữ liệu cần phải được giải quyết ngay để dự án thuận lợi thành công.
👉 Sử dụng các công cụ thống kê bất cứ khi nào có thể
Stakeholder thường phản ánh không chuẩn xác với vấn đề đang diễn ra trong thực tế. Với những stakeholder có xu hướng gây khó khăn hoặc không muốn thay đổi hành vi thì sự phản ánh đôi khi bị cường điệu hoá, quan trọng hóa vấn đề. Họ luôn thích ở trong vùng an toàn của họ và không muốn đối diện với rủi ro, bởi vì cái gì mới có thể mang lại nhiều thứ mới đòi hỏi họ phải thay đổi, và thay đổi luôn tồn tại nhiều rủi ro ngoài ý muốn. Đó là lý do làm cho bản thân họ tạo ra sự khó khăn cho dự án của bạn.
👉 Tạo ra những câu chuyện thành công để dẫn dắt sự thay đổi
Bạn xác định nhóm đối tượng khách hàng sẵn sàng thích ứng với cái mới và đặt mục tiêu tạo ra câu chuyện thành công trước. Nhiều stakeholders dễ dàng chấp nhận mục tiêu bởi vì tính cách của họ dễ dàng thích ứng, và bạn cần để ý văn hoá vùng miền, nơi họ sinh ra, sinh sống và làm việc.
👉 Hãy kiên quyết khi thấy cần thiết
Tôi đã chia sẻ nhiều về các áp dụng kỹ năng mềm để quản lý những stakeholder gây khó khăn cho dự án. Tuy nhiên, nhiều khi bạn cần quyết đoán với những đề nghị từ stakeholder.
Có một lần một stakeholder quan trọng mang đến cho tôi nhiều yêu cầu thay đổi trên phần mềm đang thiết thiết kế, với những thay đổi này gần như đội dự án phải bắt lại từ đầu, điều này là không thể, tôi đã không chấp nhận yêu cầu thay đổi đó, sự thay đổi này sẽ phủ định công sức của tất cả các thành viên còn lại trong team và quan trọng hơn nữa là dự án sẽ thất bại vì tốn quá nhiều thời gian.
Để quản lý các stakeholder thành công thì đòi hỏi người quản lý dự án cần phải cứng rắng, kiên quyết nhưng cũng cần lịch sự, bình tĩnh, giải quyết vấn đề. Kết hợp giữa khoa học quản lý và kỹ năng mềm để lôi kéo sự tham gia, hỗ trợ từ các stakeholders trong dự án. Sự hậu thuẩn này là tiền đề để dự án đi đến thành công.
👉👉👉 Bạn đã sẵn sàng tìm ra cách tiếp cận cho riêng mình chưa?
Có nhiều bạn trong khoá học quản lý dự án CNTT của tôi than thở rằng “Quản lý risk là công việc gian nan, và tôi không biết bắt đầu từ đâu”. Phần lớn các bạn có chung thắc mắc đều đến từ đội dự án và họ có kế hoạch trở thành một Project Manager trong tương lai.
Bài viết này cung cấp cho các bạn mới bắt đầu công việc quản lý dự án và các bạn đang làm quản lý dự án chưa có nhiều kinh nghiệm trong việc quản lý risk, một danh sách các mẫu tham khảo để xác định risk tìm ẩn trong giai đoạn lên kế hoạch cho một dự án mới.
👉 Hãy cùng tìm hiểu các bước xác định risk cho dự án với Project Manager mới vào nghề nhé!
Có thể nói tất cả các dự án luôn có rủi ro. Nếu một rủi ro tìm ẩn mà không được phát hiện sớm thì có thể gây tác động không tốt đến việc hoàn thành dự án đúng thời gian, trong phạm vi ngân sách và đáp ứng đúng kỳ vọng về chất lượng.
Xác định rủi ro là bao gồm tập hợp các công việc như: lên kế hoạch quản lý rủi ro, xác định rủi ro, phân tích, lên kế hoạch ứng phó với rủi ro đã được xác định, và kiểm soát rủi ro trong dự án.
Mục đính của quản lý rủi ro trong dự án là làm tăng khả năng và tác động của các sự kiện tích cực, và làm giảm khả năng và tác động của các sự kiện tiêu cực cho dự án.
Một số công cụ và kỹ thuật mà bạn có thể dùng để xác định rủi ro theo khuyến nghị của PMBOK
✅ Kỹ thuật thu thập yêu cầu nghiệp vụ: Kỹ thuật Barainstrorming, Kỹ thuật Root Cause Analysis, kỹ thuật phỏng vấn.
✅ Review tài liệu
✅ Checklist Analysis – Sử dụng lại các checklist trong các dự án tương tự đã thành công trong quá khứ
✅ Assumption analysis, SWOT Analysis
✅ Kỹ thuật Diagramming – cause and effect diagram, system and process flow chart, influence diagrams
Bên dưới là danh sách một số loại rủi ro (risk category) và các ví dụ về nguy cơ tìm ẩn có thể xác định ở giai đoạn lên kế hoạch quản lý rủi ro.
🔎 Rủi ro Schedule
- Lịch trình không thực tế, chỉ có “trường hợp tốt nhất”
- Nhiệm vụ quan trọng bị xót từ lịch trình
- Một sự chậm trễ trong một nhiệm vụ gây ra sự chậm trễ các nhiệm vụ phụ thuộc trong dự án
- Các công việc không quen thuộc của các sản phẩm mất nhiều thời gian hơn dự kiến để thiết kế và thực hiện
🔎 Rủi ro từ yêu cầu nghiệp vụ
- Yêu cầu đã baselined nhưng vẫn tiếp tục thay
- Chất lượng yêu cầu kém được xác định, và gây ra khả năng mở rộng phạm vi của dự án
- Công việc đặt các tính năng của sản phẩm tốn nhiều thời gian hơn dự kiến
- Yêu cầu chỉ được nhận biết một phần ở giai đoạn đầu của dự án
- Tổng các tính năng yêu cầu có thể vượt quá những gì mà nhóm phát triển chuyển giao trong thời gian có sẵn
🔎 Rủi ro về sản phẩm, công nghệ
- Kết quả phát triển các giao diện người dùng sai trong khâu thiết kế và phải thực hiện lại
- Đội dự án phát triển các chức năng phần mềm bổ sung mà không được yêu cầu ở thời điểm lên kế hoạch
- Yêu cầu tích hợp với các sản phẩm khác chưa được nhóm nghiên cứu xác định giải pháp kỹ thuật trước khi thực hiện
- Công nghệ mới áp dụng vào quá trính phát triển sản phẩm không được hỗ trợ đầy đủ từ nhà cung cấp
- Sản phẩm công nghệ chọn lựa cho dự án không giải quyết được vấn đề hoặc nhu cầu của khách hàng
- Giải pháp thay thế không được chọn lựa dự trên các tiêu chí khách quan
- Tổ chức không cung cấp đủ tài nguyên làm việc cho dự án như đã cam kết
🔎 Rủi ro trong khâu quản lý dự án
- Project Manager có uy quyền hạn chế trong cơ cấu tổ chức và ít quyền lực cá nhân gây ảnh hưởng đến việc ra quyết định và các nguồn lực cho dự án
- Độ ưu tiên chuyển giao các hạng mục thay đổi thường xuyên
- Điều kiện để xác định thành công ở mỗi giai đoạn của dự án không được định nghĩa rõ ràng
- Các dự án trong chương trình cần dùng nhân sự, tài nguyên giống nhau cùng một thời điểm (đối với một chương trình có nhiều dự án nhỏ)
- Ngày tích hợp sản phẩm, chuyển giao sản phẩm, demo,… không được đội dự án tính toán kỹ.
🔎 Rủi ro đến từ khách hàng
- Khách yêu cầu những tính năng mới ngoài phạm vi
- Khách hàng không sẵn sàng, hoặc trì hoãn việc cung cấp yêu cầu, xem xét thiết kế, xác nhận yêu cầu, và cả việc nghiệm thu sản phẩm cho mỗi đợt phát hành
- Khách hàng kỳ vọng tốc độ phát triển và chuyển giao sản phẩm nhanh hơn so với khả năng của đội kỹ thuật
- Chính trị ở khách hàng phức tạp và có quá nhiều người không muốn dự án thành công
🔎 Rủi ro từ nhân sự tham gia dự án và nhà thầu
- Tổ chức không cung cấp đủ nhân sự có chất lượng như đã yêu cầu
- Một số công việc quan trọng chỉ được thực hiện bởi duy nhất một nhà phát triển
- Một số nhà phát triển có thể rời khỏi dự án trước khi dự án được hoàn thành
- Quy trình cung cấp nguồn nhân lực, hoặc thuê nhân sự bên ngoài tốn thời gian hơn dự kiến
- Đội ngũ kỹ thuật cần thêm thời gian để làm quen với công cụ phát triển, công nghệ, phương thức phát triển dự án
- Hợp đồng của đội ngũ nhân sự kết thúc trong thời gian triển khai dự án
- Xung đột giữa các thành viên trong đội dự án dẫn đến giao tiếp kém, kết quả công việc kém, và re-work diễn ra thường xuyên
- Nhà thầu không cung cấp đầy đủ các thành phần, công cụ như đã cam kết
🕵️♀️🕵️♀️🕵️♀️ Xác định rủi ro trong dự án là công việc rất quan trọng cho một nhà quản lý dự án trong giai đoạn lên kế hoạch. Công việc đòi hỏi người quản lý dự án lôi kéo các thành viên tham gia dự án hỗ trợ mình trong xuyên suốt dự án để tiếp tục xác định, theo dõi, và xử lý.
Khi một rủi ro được xác định thì cần phải đánh giá độ ưu tiên xử lý phù hợp với các hướng giảm thiểu rủi ro nếu rủi ro trở thành vấn đề. Không phải rủi ro nào cũng đánh giá độ ưu tiên xử lý cao.
Bạn sẽ thấy các dự án xem nhẹ việc quản lý risk thì dự án ấy có xu hướng phải xử lý rất nhiều vấn đề phát sinh và phải re-work.
Ngày nay, có rất nhiều kỹ thuật và phương pháp xác định risk khác nhau. Bạn cần tham khảo và chọn lựa kỹ thuật phù hợp với mình và năng lực của đội dự án.
👉 Xác định và quản lý risk tốt là tiền đề cho dự án của bạn hoàn thành thành công.
Continuous Delivery is a process, where code changes are automatically built, tested, and prepared for a release to production. I hope you have enjoyed my previous blogs on Jenkins. Here, I will talk about the following topics::
What is Continuous Delivery?
Types of Software Testing
Difference Between Continuous Integration, Delivery, and Deployment
What is the need for Continuous Delivery?
Hands-on Using Jenkins and Tomcat
Let us quickly understand how Continuous Delivery works.
What Is Continuous Delivery?
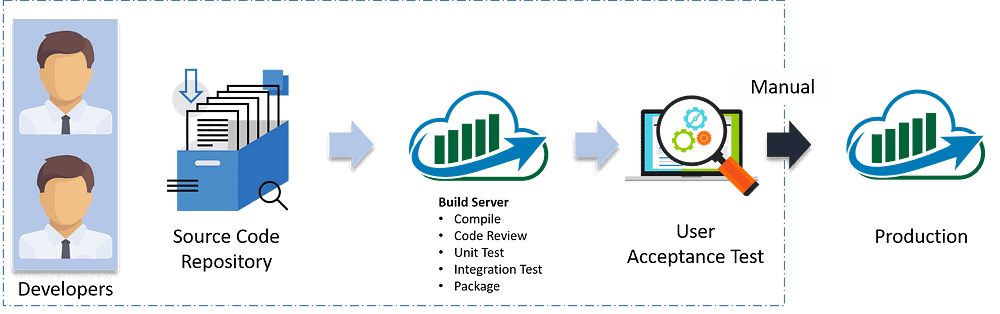
It is a process where you build software in such a way that it can be released to production at any time. Consider the diagram below:
Let me explain the above diagram:
Automated build scripts will detect changes in Source Code Management (SCM) like Git.
Once the change is detected, source code would be deployed to a dedicated build server to make sure build is not failing and all test classes and integration tests are running fine.
Then, the build application is deployed on the test servers (pre-production servers) for User Acceptance Test (UAT).
Finally, the application is manually deployed on the production servers for release.
Before I proceed, it will only be fair I explain to you the different types of testing.
Types of Software Testing:
Broadly speaking there are two types of testing:
Blackbox Testing: It is a testing technique that ignores the internal mechanism of the system and focuses on the output generated against any input and execution of the system. It is also called functional testing. It is basically used for validating the software.
Whitebox Testing: is a testing technique that takes into account the internal mechanism of a system. It is also called structural testing and glass box testing. It is basically used for verifying the software.
Whitebox testing:
There are two types of testing, that falls under this category.
Unit Testing: It is the testing of an individual unit or group of related units. It is often done by the programmer to test that the unit he/she has implemented is producing expected output against given input.
Integration Testing: It is a type of testing in which a group of components is combined to produce the output. Also, the interaction between software and hardware is tested if software and hardware components have any relation. It may fall under both white box testing and black box testing.
Blackbox Testing:
There are multiple tests that fall under this category. I will focus on a few, which are important for you to know, in order to understand this blog:
Functional/ Acceptance Testing: It ensures that the specified functionality required in the system requirements works. It is done to make sure that the delivered product meets the requirements and works as the customer expected
System Testing: It ensures that putting the software in different environments (e.g., Operating Systems) it still works.
Stress Testing: It evaluates how the system behaves under unfavorable conditions.
Beta Testing: It is done by end users, a team outside development, or publicly releasing full pre-version of the product which is known as a beta version. The aim of beta testing is to cover unexpected errors.
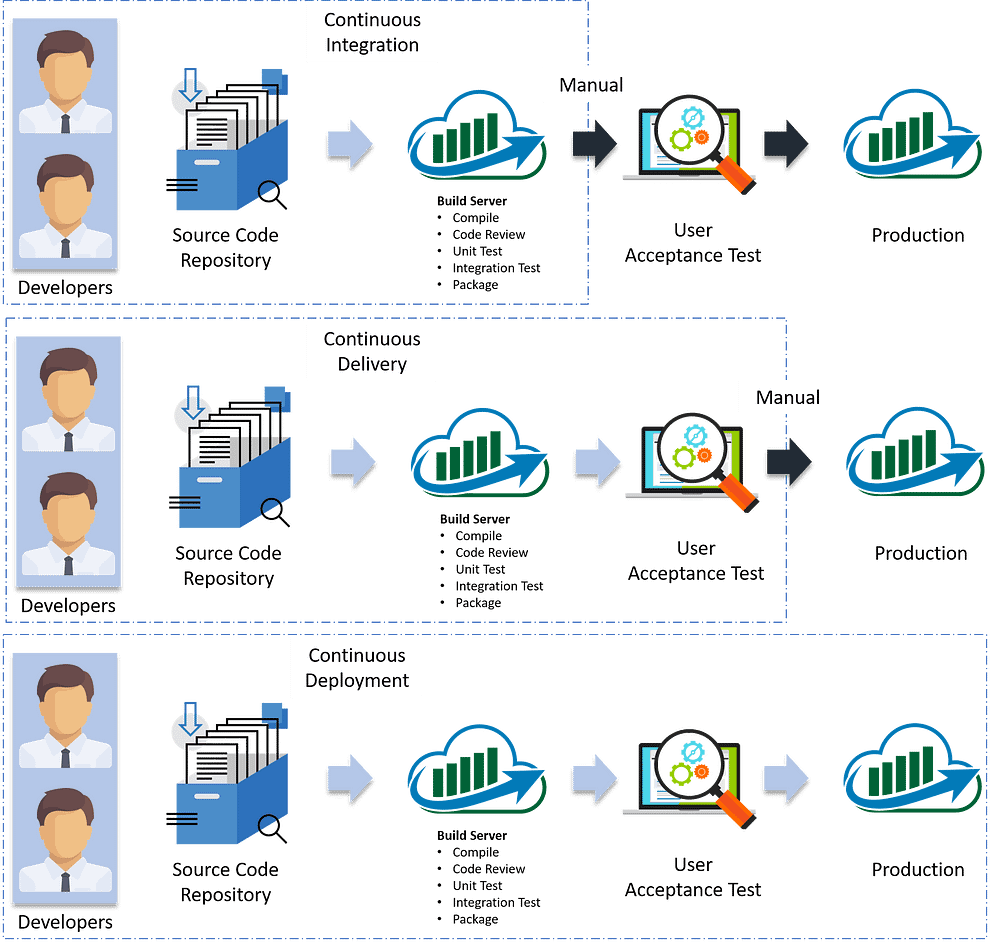
Now is the correct time for me to explain the difference between Continuous Integration, Delivery, and Deployment.
Differences Between Continuous Integration, Delivery, And Deployment:
Visual content reaches an individual’s brain in a faster and more understandable way than textual information. So I am going to start with a diagram which clearly explains the difference:
In Continuous Integration, every code commit is build and tested, but, is not in a condition to be released. I mean the build application is not automatically deployed on the test servers in order to validate it using different types of Blackbox testing like — User Acceptance Testing (UAT).
In Continuous Delivery, the application is continuously deployed on the test servers for UAT. Or, you can say the application is ready to be released to production anytime. So, obviously Continuous Integration is necessary for Continuous Delivery.
Continuous Deployment is the next step past Continuous Delivery, where you are not just creating a deployable package, but you are actually deploying it in an automated fashion.
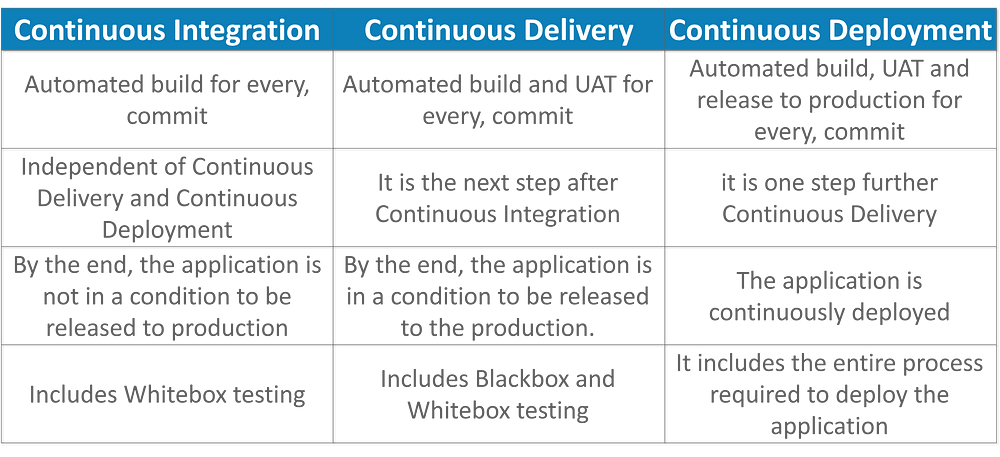
Let me summarize the differences using a table:
In simple terms, Continuous Integration is a part of both Continuous Delivery and Continuous Deployment. And Continuous Deployment is like Continuous Delivery, except that releases happen automatically.
But the question is, whether Continuous Integration is enough.
Why We Need Continuous Delivery?
Let us understand this with an example.
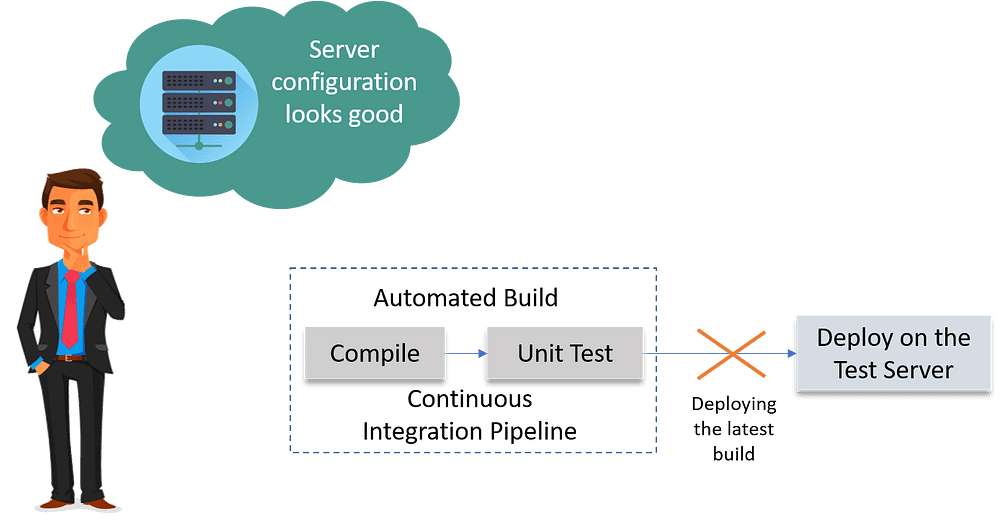
Imagine there are 80 developers working on a large project. They are using Continuous Integration pipelines in order to facilitate automated builds. We know build includes Unit Testing as well. One day they decided to deploy the latest build that had passed the unit tests into a test environment.
This must be a lengthy but controlled approach to deployment that their environment specialists carried out. However, the system didn’t seem to work.
What Might Be The Obvious Cause Of The Failure?
Well, the first reason that most of the people will think is that there is some problem with the configuration. Like most of the people even they thought so. They spent a lot of time trying to find what was wrong with the configuration of the environment, but they couldn’t find the problem.
One Perceptive Developer Took A Smart Approach:
Then one of the senior Developer tried the application on his development machine. It didn’t work there either.
He stepped back through earlier and earlier versions until he found that the system had stopped working three weeks earlier. A tiny, obscure bug had prevented the system from starting correctly. Although, the project had good unit test coverage. Despite this, 80 developers, who usually only ran the tests rather than the application itself, did not see the problem for three weeks.
Problem Statement:
Without running Acceptance Tests in a production-like environment, they know nothing about whether the application meets the customer’s specifications, nor whether it can be deployed and survive in the real world. If they want timely feedback on these topics, they must extend the range of their continuous integration process.
Let me summarize the lessons learned by looking at the above problems:
Unit Tests only test a developer’s perspective of the solution to a problem. They have only a limited ability to prove that the application does what it is supposed to from a users perspective. They are not enough to identify the real functional problems.
Deploying the application on the test environment is a complex, manually intensive process that was quite prone to error. This meant that every attempt at deployment was a new experiment — a manual, error-prone process.
They took Continuous Integration (Continuous Delivery) to the next step and introduced a couple of simple, automated Acceptance Tests that proved that the application ran and could perform its most fundamental function. The majority of the tests running during the Acceptance Test stage are Functional Acceptance Tests.
Basically, they built a Continuous Delivery pipeline, in order to make sure that the application is seamlessly deployed on the production environment, by making sure that the application works fine when deployed on the test server which is a replica of the production server.
Enough of the theory, I will now show you how to create a Continuous Delivery pipeline using Jenkins.
Continuous Delivery Pipeline Using Jenkins:
Here I will be using Jenkins to create a Continuous Delivery Pipeline, which will include the following tasks:
Steps involved in the Demo:
Fetching the code from GitHub
Compiling the source code
Unit testing and generating the JUnit test reports
Packaging the application into a WAR file and deploying it on the Tomcat server
Pre-requisites:
CentOS 7 Machine
Jenkins 2.121.1
Docker
Tomcat 7
Step — 1 Compiling The Source Code:
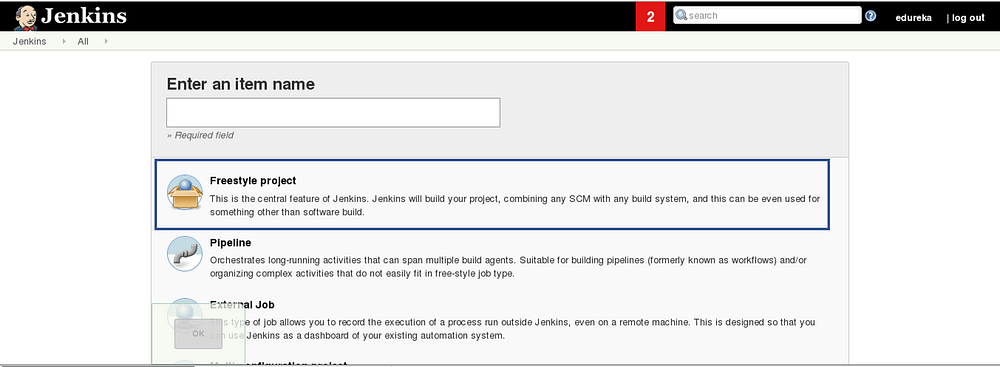
Let’s begin by first creating a Freestyle project in Jenkins. Consider the below screenshot:
Give a name to your project and select Freestyle Project:
When you scroll down you will find an option to add source code repository, select git and add the repository URL, in that repository, there is a pom.xml fine which we will use to build our project. Consider the below screenshot:
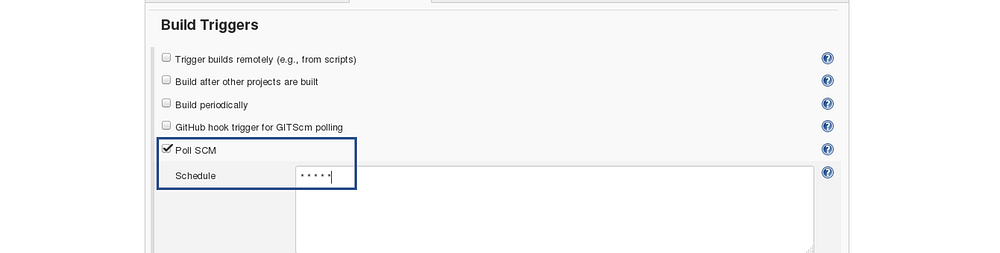
Now we will add a Build Trigger. Pick the poll SCM option, basically, we will configure Jenkins to poll the GitHub repository after every 5 minutes for changes in the code. Consider the below screenshot:
Before I proceed, let me give you a small introduction to the Maven Build Cycle.
Each of the build life cycles is defined by a different list of build phases, wherein a build phase represents a stage in the life cycle.
Following is the list of build phases:
validate — validate the project is correct and all necessary information is available
compile — compile the source code of the project
test — test the compiled source code using a suitable unit testing framework. These tests should not require the code to be packaged or deployed
package — take the compiled code and package it in its distributable format, such as a JAR.
verify — run any checks on results of integration tests to ensure quality criteria are met
install — install the package into the local repository, for use as a dependency in other projects locally
deploy — done in the build environment, copies the final package to the remote repository for sharing with other developers and projects.
I can run the below command, for compiling the source code, unit testing and even packaging the application in a war file:
mvn clean package
You can also break down your build job into a number of build steps. This makes it easier to organize builds in clean, separate stages.
So we will begin by compiling the source code. In the build tab, click on invoke top level maven targets and type the below command:
compile
Consider the below screenshot:
This will pull the source code from the GitHub repository and will also compile it (Maven Compile Phase).
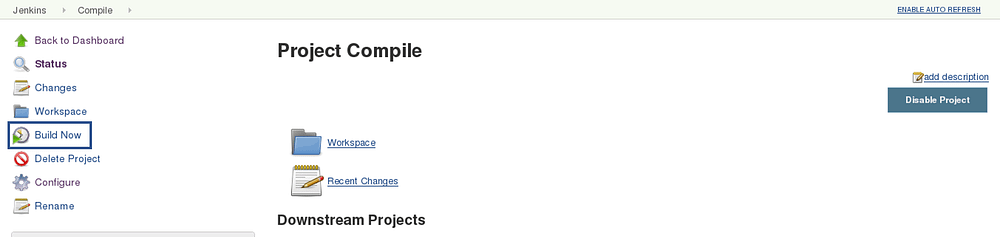
Click on Save and run the project.
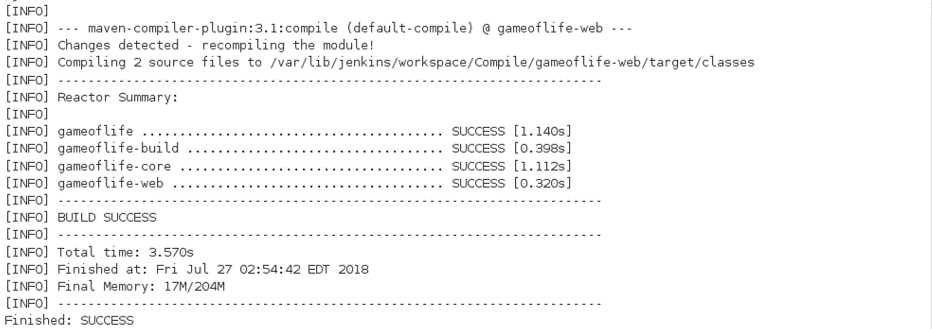
Now, click on the console output to see the result.
Step — 2 Unit Testing:
Now we will create one more Freestyle Project for unit testing.
Add the same repository URL in the source code management tab, like we did in the previous job.
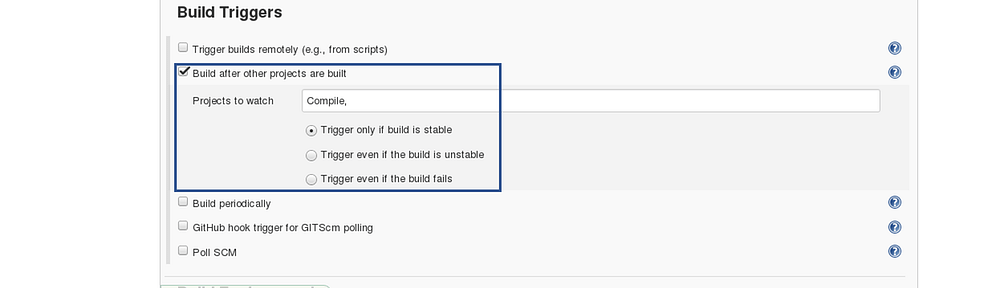
Now, in the “Buid Trigger” tab click on the “build after other projects are built”. There type the name of the previous project where we are compiling the source code, and you can select any of the below options:
Trigger only if the build is stable
Trigger even if the build is unstable
Trigger even if the build fails
I think the above options are pretty self-explanatory so, select any one. Consider the below screenshot:
In the Build tab, click on invoke top level maven targets and use the below command:
test
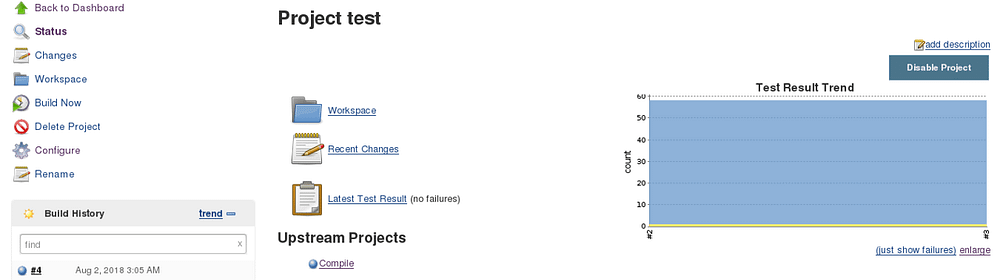
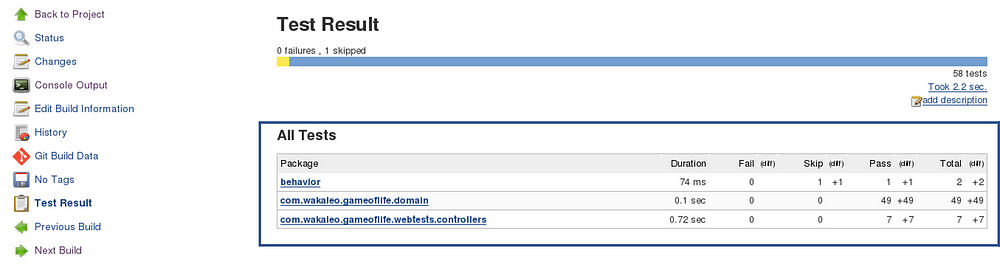
Jenkins also does a great job of helping you display your test results and test result trends.
The de facto standard for test reporting in the Java world is an XML format used by JUnit. This format is also used by many other Java testing tools, such as TestNG, Spock, and Easyb. Jenkins understands this format, so if your build produces JUnit XML test results, Jenkins can generate nice graphical test reports and statistics on test results over time, and also let you view the details of any test failures. Jenkins also keeps track of how long your tests take to run, both globally, and per test — this can come in handy if you need to track down performance issues.
So the next thing we need to do is to get Jenkins to keep tabs on our unit tests.
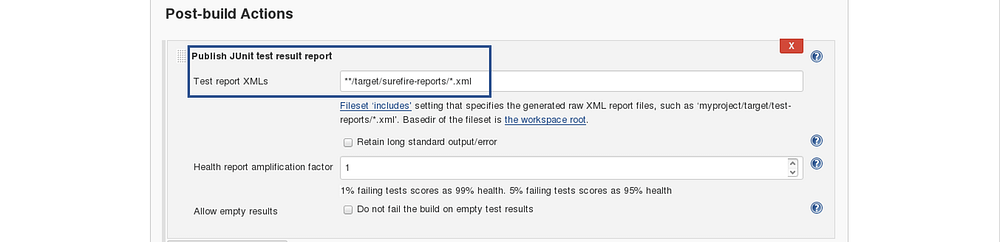
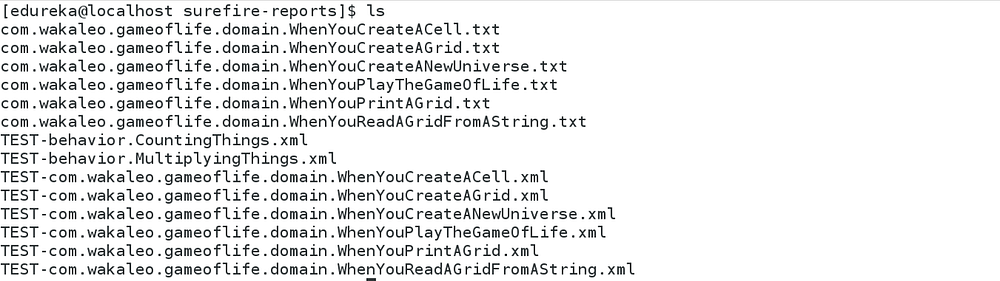
Go to the Post-build Actions section and tick “Publish JUnit test result report” checkbox. When Maven runs unit tests in a project, it automatically generates the XML test reports in a directory called surefire-reports. So enter “**/target/surefire-reports/*.xml” in the “Test report XMLs” field. The two asterisks at the start of the path (“**”) are a best practice to make the configuration a bit more robust: they allow Jenkins to find the target directory no matter how we have configured Jenkins to check out the source code.
**/target/surefire-reports/*.xml
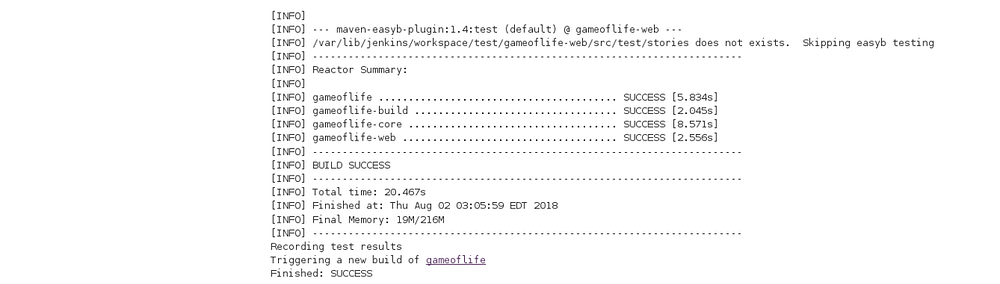
Again save it and click on Build Now.
Now, the JUnit report is written to /var/lib/jenkins/workspace/test/gameoflife-core/target/surefire-reports/TEST-behavior.
In the Jenkins dashboard you can also notice the test results:
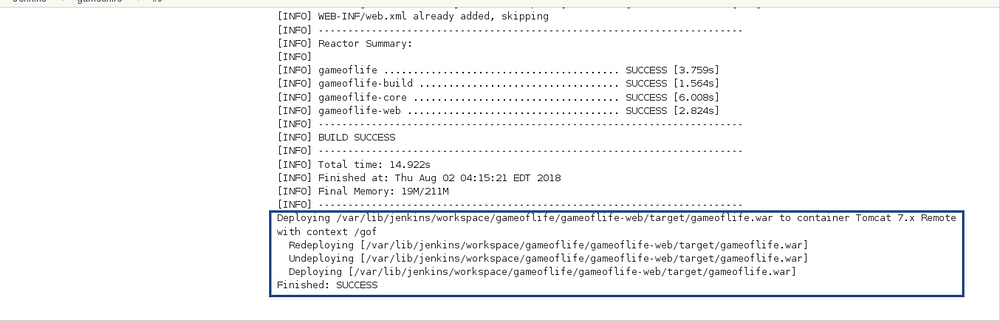
Step — 3 Creating A WAR File And Deploying On The Tomcat Server:
Now, the next step is to package our application in a WAR file and deploy that on the Tomcat server for User Acceptance test.
Create one more freestyle project and add the source code repository URL.
Then in the build trigger tab, select build when other projects are built, consider the below screenshot:
Basically, after the test job, the deployment phase will start automatically.
In the build tab, select shell script. Type the below command to package the application in a WAR file:
mvn package
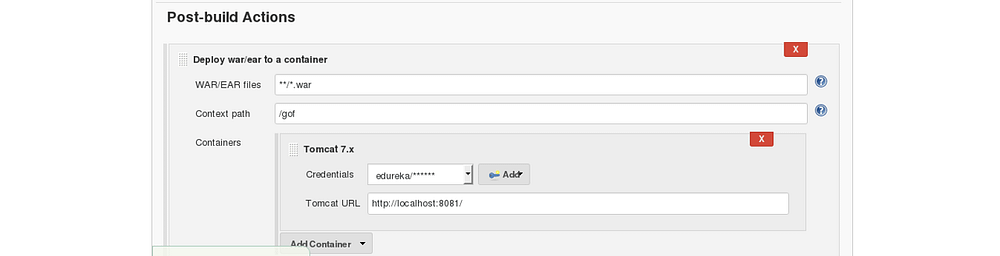
Next step is to deploy this WAR file to the Tomcat server. In the “Post-Build Actions” tab select deploy war/ear to a container. Here, give the path to the war file and give the context path. Consider the below screenshot:
Select the Tomcat credentials and, notice the above screenshot. Also, you need to give the URL of your Tomcat server.
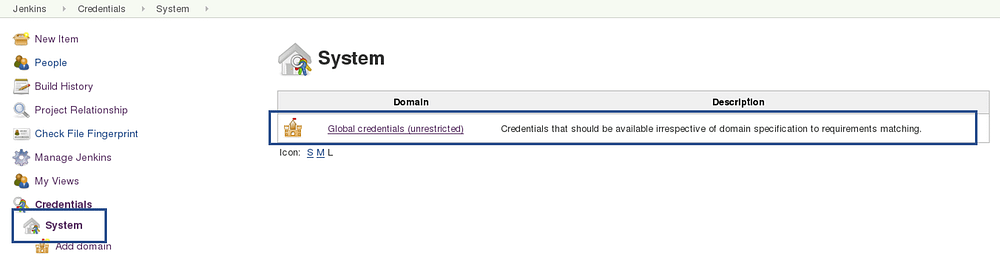
In order to add credentials in Jenkins, click on credentials option on the Jenkins dashboard.
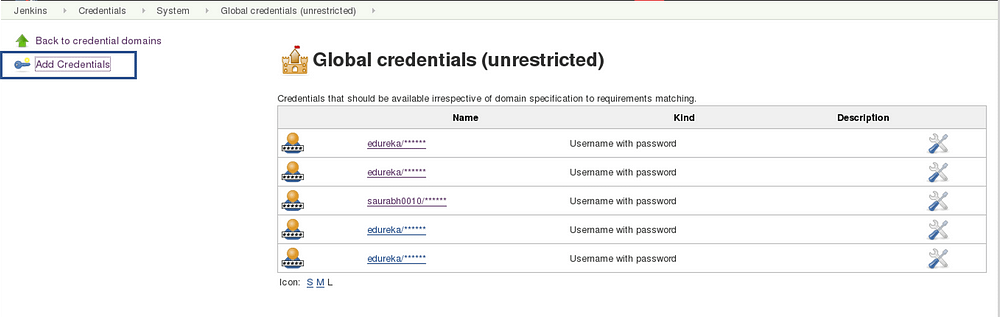
Click on System and select global credentials.
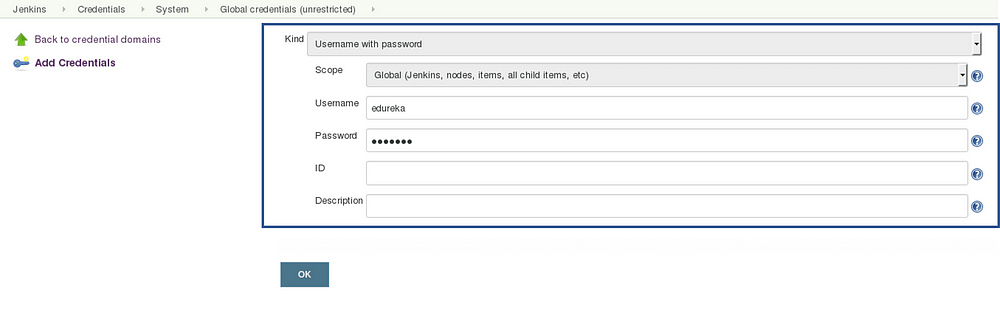
Then you will find an option to add the credentials. Click on it and add credentials.
Add the Tomcat credentials, consider the below screenshot.
Click on OK.
Now in your Project Configuration, add the tomcat credentials which you have inserted in the previous step.
Click on Save and then select Build Now.
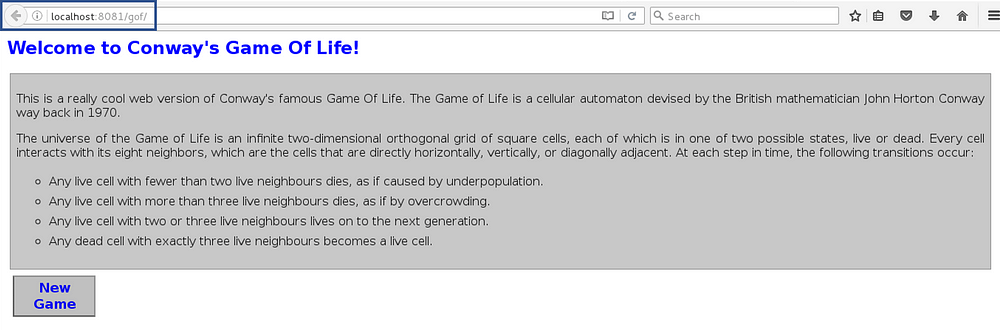
Go to your tomcat URL, with the context path, in my case it is http://localhost:8081. Now add the context path in the end, consider the below Screenshot:
I hope you have understood the meaning of the context path.
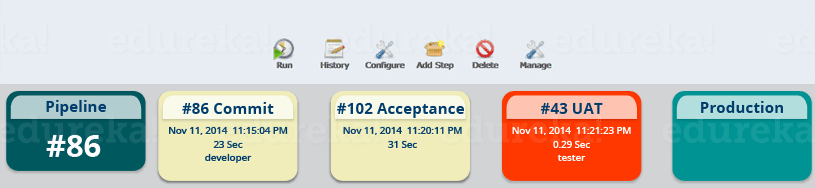
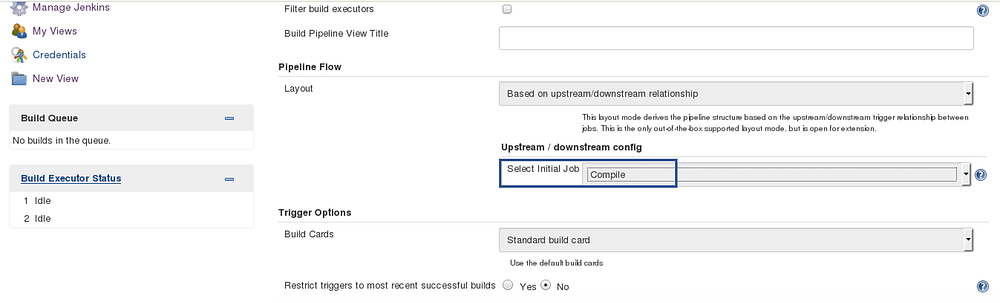
Now create a pipeline view, consider the below screenshot:
Click on the plus icon, to create a new view.
Configure the pipeline the way you want, consider the below screenshot:
I did not change anything apart from selecting the initial job. So my pipeline will start from compile. Based on the way I have configured other jobs, after compile testing and deployment will happen.
Finally, you can test the pipeline by clicking on RUN. After every five minutes, if there is a change in the source code, the entire pipeline will be executed.
So we are able to continuously deploy our application on the test server for user acceptance test (UAT).
I hope you have enjoyed reading this post on Continuous Delivery.If you wish to check out more articles on the market’s most trending technologies like Artificial Intelligence, Python, Ethical Hacking, then you can refer to Edureka’s official site.
Do look out for other articles in this series which will explain the various other aspects of DevOps.